Roasted squash and pear salad with cider vinaigrette

This hearty fall salad is filling, healthy, and comforting. #meandthemoose #saladrecipe #noboringsalads #salad #fall #fallsalad #squash #kale #pear #fallcomfortfood

This salad is complex enough for the foodies in your life, but filled with ingredients yummy enough for even discerning little ones (maybe paired down to its component parts, but it depends on your kid).

Take me to the salad!

This hearty fall salad is filling, healthy, and comforting. #meandthemoose #saladrecipe #noboringsalads #salad #fall #fallsalad #squash #kale #pear #fallcomfortfood

So, I’ve mostly succumbed to my existential dread and begun inhaling the Halloween candy that I SWORE I wouldn’t open until October 31st. Since my snacking has taken a turn and I also feel like it’s not really fall until I post a kale salad with some sort of roasted squash, I’m coming in hot with this baby today.

Lacinto kale (Tuscan/Dinosaur kale) is the base. This is my favorite kale to use in salads because you can dress it way in advance and it’ll stay crisp for days (and no one can complain about soggy lettuce!). It also stands up well against the nuts, seeds, roasted veggies, and tangy dressing here.

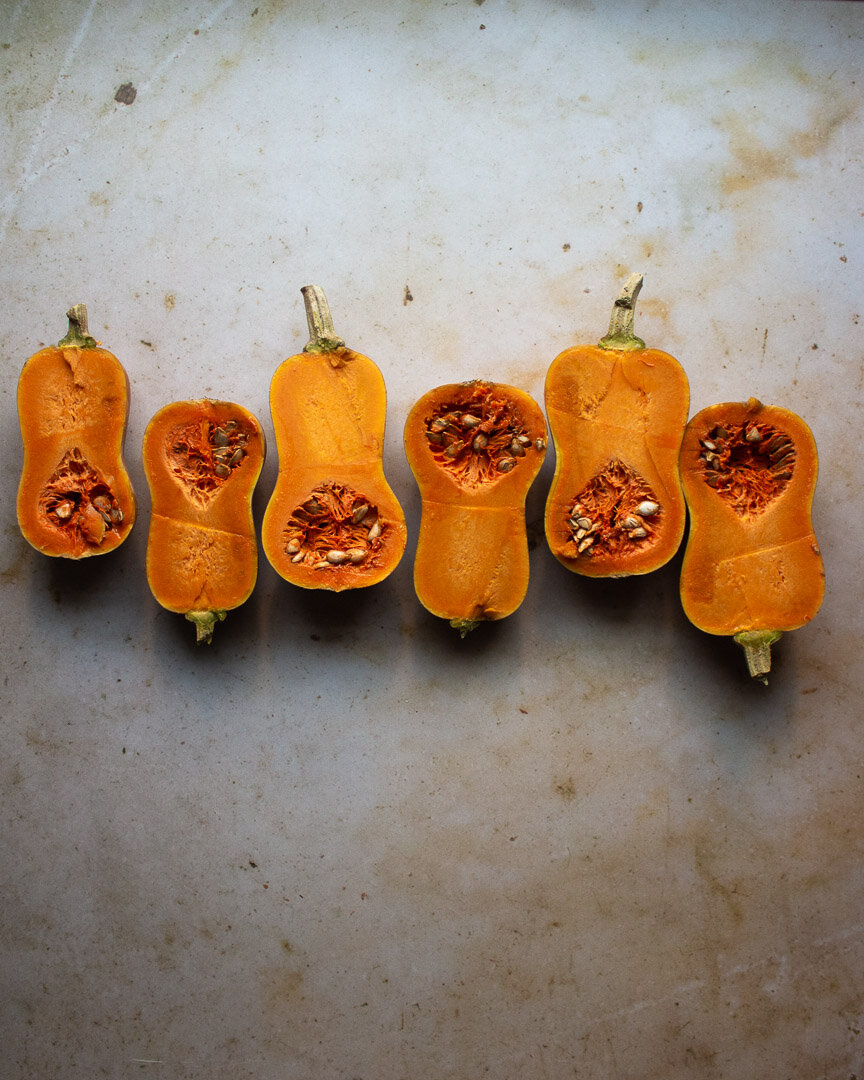
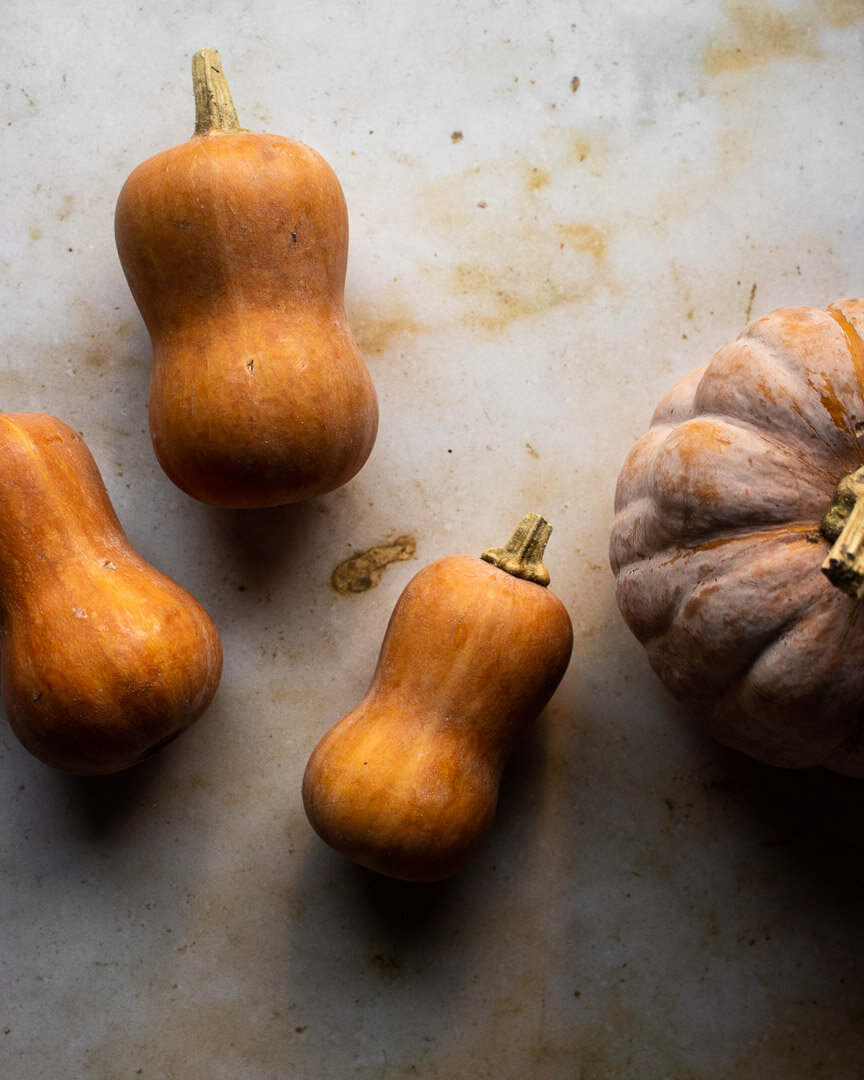
I roasted some honeynut squash (above) which looks like a mini butternut, but is oh so much better. I find butternut squash a little too bland and watery and there are so many other varieties with more taste and body like kabocha and koginut. Plus, they’re so puuuurty.

You might be thinking— “What is this woman smoking if she thinks I’m going to roast squash, toast nuts, fry sage and shallots, AND make a dressing mid-day on a Wednesday.” But hear me out. My squash-roasting method is so easy: split the squash in half, scoop out the seeds, and place it on a baking sheet cut side down and roast at 425 until fork tender (no peeling or stem trimming required!). Set it and forget it!

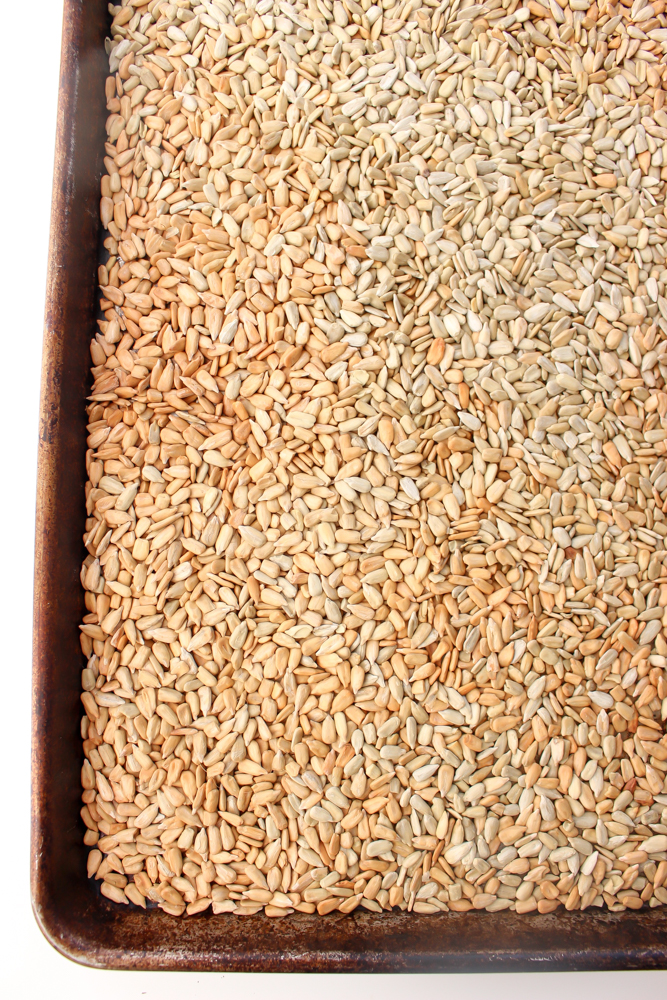
The nuts and seeds can be toasted alongside the squash in a separate small pan for like 4-5 minutes without any sort of prep at all (skins still on!).

Finally, the sautéed shallots and sage…well, there’s no way to make them easier. They’re not HARD by any stretch, but they require a little more work than your average salad, I’ll give you that. But they make this salad an EVENT, so if you CAN slow down and make yourself a nice lunch, I guarantee it’ll be worth it. Also, my kid loves fried shallots, so it’s a selling point in his book.

This hearty fall salad is filling, healthy, and comforting. #meandthemoose #saladrecipe #noboringsalads #salad #fall #fallsalad #squash #kale #pear #fallcomfortfood

Roasted Squash and Pear Salad with Cider Vinaigrette

Time: 1 hour (about 40 minutes active)
Yield: 2 meal-sized salads or 3 side salads

2-4 small, firm fleshed squash like Delicata, Koginut, or Kabocha
1 bunch Lacinto kale (also called Tuscan or Dinosaur), washed, de-stemmed, and torn
1 Tbsp olive oil
Large pinch of salt
1/4 cup raw hazelnuts
2 Tbsp raw pumpkin seeds
1 Tbsp butter
1 large or 2 small shallots, thinly sliced
5-6 large sage leaves
1/4 cup feta, goat’s cheese, or any other cheese you like
1 large pear, cored and sliced
Large pinch of Allepo pepper (optional)
Cider vinaigrette (recipe below)

For the cider vinaigrette
2 Tbsp olive oil
2-3 Tbsp apple cider vinegar
1/2 tsp honey
1/2 tsp kosher salt
1/4 tsp smoked paprika

Preheat the oven to 425. Split the squash down the middle with a sharp knife, scoop out the seeds and stringy bits from the center, and place cut side down on a parchment or foil lined baking sheet. DO NOT trim the ends or the stem off of the squash. Bake until the outer skin and inner flesh is fork tender, about 35-40 minutes depending upon the size and amount of squash (I like to roast a lot at once so I can freeze the extra and use it for future dishes). Let cool. The skin will slip off of the flesh easily.

While the squash is cooking, prep the kale. Wash, tear the leaves off of the tough inner stems, and then rip the leaves into medium pieces. Top with 1 Tbsp of olive oil and massage and squeeze the kale with your hands to make it more tender. Sprinkle with a large pinch of salt.

In a separate pan, place the raw nuts and seeds. Toast in the oven with the squash for 4-5 minutes or until the nuts and seeds begin to toast and smell nutty. Keep a close eye to prevent burning.

In a small saute pan, melt the butter over a medium high flame. Add the shallots and cook, stirring, until they begin to brown, about 5 minutes. Add the sage leaves and cook until they go dark and crispy.

Make the dressing: Combine all of the ingredients in a small bowl and whisk until well combined. Or use a small jar with a lid and shake until combined.

Top the lettuce with enough of the dressing to coat well. Add the squash, nuts, seeds, fried shallots, fried sage, and cheese. Just before serving, core and slice the pear and add to the salad (to prevent browning). Top with a large pinch of Aleppo pepper or other little bit of heat and more salt if necessary. Top with the rest of the dressing.

Tomatillo gazpacho

This barely cooked soup combines the best of summer vegetables like tomatoes, cucumbers, and zucchini and manages to be both light and filling. #meandthemoose #summer #nocookrecipes #soup #gazpacho #tomatorecipes

Make the most of summer produce with a tangy gazpacho that manages to be both light and surprisingly hearty.

Take me to the soup!

This barely cooked soup combines the best of summer vegetables like tomatoes, cucumbers, and zucchini and manages to be both light and filling. #meandthemoose #summer #nocookrecipes #soup #gazpacho #tomatorecipes

The calendar has turned to September, friends. Most years I’m desperate for the fall to come. I’d be happy if it was sweater weather and apple season all year round.

But this year I sort of wish I could freeze time (but also, skip over the next bit entirely). We still have a week before Kindergarten starts for M, which means, I’m not yet worrying about an email from the school saying that someone has Covid. And Z is at the perfect baby stage where he’s sleeping more, crying less (sort of), and has a personality, but isn't yet mobile.

I hate this instinct of mine to imagine that whatever is coming will be bad. Or that if I imagine all the possible bads, that I can stop them from coming. What is that? Did I inherit some DNA from great great great great-grandmother Esther who escaped the pogroms?

Anyway, I’ve been dealing with all this dread by eating gobfulls of not-great food. I’m not even trying to food shame myself. I don’t think anyone would classify my current eating regimen as “balanced.” And I’m certainly not eating only things that taste absolutely delicious. I’m eating for the sole purpose of thinking about something other than my fears. It’s not great, Dan.

Consequently, I’m trying to come up with meals that are a little more veg-heavy while still being fun and tasty and most importantly, simple. Because, though I’m cooking and eating to stop myself from worrying, I’m also deeply committed to worrying and thus, don’t want to take too much time away from the task of imagining any and all worst-case-scenarios. You know, in case I CAN stop them from happening with my imagination.

This barely cooked soup combines the best of summer vegetables like tomatoes, cucumbers, and zucchini and manages to be both light and filling. #meandthemoose #summer #nocookrecipes #soup #gazpacho #tomatorecipes

So, this gazpacho. I used to hate gazpacho. As Lisa Simpson described, it’s tomato soup served ice cold. But when it’s good, it’s oh so much more than that. Our favorite farmstand had tons of beautiful tomatillos, so I bought some and threw them into the toaster oven (but you can obviously use a real oven too) and then threw them into the soup. The rest is really your standard Spanish gazpacho with none of the American faff that we often add. Think veggies at their peak, aromatics, salt, vinegar, and lots of olive oil.

I also realized that, while straining is a pain and you end up throwing out a lot of stuff that you could otherwise eat, it also makes the texture SO MUCH BETTER. So now I strain even though it’s a pain. But you certainly don’t have to. It saves time and this recipe yields a lot more soup when it includes the tougher stuff.

This barely cooked soup combines the best of summer vegetables like tomatoes, cucumbers, and zucchini and manages to be both light and filling. #meandthemoose #summer #nocookrecipes #soup #gazpacho #tomatorecipes

A couple of notes:

  • Please don’t reduce the oil content in this soup. It gives the dish its body and staying power. Without it, you might as well open a can of V8.

  • Tomatillos are a little sour and as such, give another dimension to the soup. But you can absolutely skip them and use all tomatoes.

  • Start with 1/2 tsp of kosher salt. I’ve found that this soup can easily taste too salty if you go overboard.

Tomatillo Gazpacho

Yield: about 3.5 cups (depending on how juicy your veggies are) 
Time: 25 minutes, all active (less if you choose not to strain the soup)

¼ lb tomatillos, husks removed, rinsed of the sticky residue, and halved
1¾ lb heirloom, plum, or other red tomatoes
1 small cucumber, peeled and roughly chopped
1 small zucchini, roughly chopped
3 large scallions, green and white parts roughly chopped
2 Tbsp red wine vinegar
1/2-1 tsp fine sea salt
½ cup olive oil

Preheat the oven or toaster oven to 350. On a parchment or foil covered baking sheet, place the halved tomatillos face down. Bake for 5-7 minutes or until the tomatillos have softened a bit, but aren’t completely mushy.

While the tomatillos are cooking, roughly chop the rest of the vegetables.

Add the tomatillos, tomatoes, cucumber, zucchini, scallions, vinegar, and salt to your blender and blend on high for 2 minutes. 

While the blender runs, add the olive oil in a slow stream until it’s completely incorporated, about 2 more minutes. 

Strain the soup through a fine mesh sieve.

Test for seasoning and add more salt or vinegar if needed.

Chill for 2 hours or up to 1 week.

Pickled veggie pasta salad

This pasta salad requires a tiny bit of forethought so that you can let the veggies pickle for a few hours, but it’s well worth the effort for a crowd-pleasing, tangy and bright salad that complements any other BBQ dishes. #meandthemoose #pastasalad…

This pasta salad requires a tiny bit of forethought so that you can let the veggies pickle for a few hours, but it’s well worth the effort for a crowd-pleasing, tangy and bright salad that complements any other BBQ dishes. #meandthemoose #pastasalad #pastarecipes #summerbbq #pickles #pickledveggies

This is my platonic ideal of pasta salad: Tangy, bright, and crunchy, but also a little creamy and, frankly, oily. You can’t help but smell a smoky grill, hear kids laughing, and feel the sun in your face with this salad on your plate.

Just the pasta, please.

This pasta salad requires a tiny bit of forethought so that you can let the veggies pickle for a few hours, but it’s well worth the effort for a crowd-pleasing, tangy and bright salad that complements any other BBQ dishes. #meandthemoose #pastasalad…

This pasta salad requires a tiny bit of forethought so that you can let the veggies pickle for a few hours, but it’s well worth the effort for a crowd-pleasing, tangy and bright salad that complements any other BBQ dishes. #meandthemoose #pastasalad #pastarecipes #summerbbq #pickles #pickledveggies

So, pasta salad is often an underwhelming affair. It feels necessary at BBQs and is easy to produce in huge quantities. And sans eggs or mayo, it keeps in the sun for hours without risking a side of salmonella. But what a waste when it’s totally boring!

This recipe uses a huge quantity of quick-pickled seasonal vegetables and aromatics, which takes a little pre-planning, but is very worth it. My kid also happens to love pickles, which is a pretty good way to get him to eat veggies. And when you do the pickling, you control the salt, sugar, and other junk that enters the mix.

This pasta salad requires a tiny bit of forethought so that you can let the veggies pickle for a few hours, but it’s well worth the effort for a crowd-pleasing, tangy and bright salad that complements any other BBQ dishes. #meandthemoose #pastasalad…

This pasta salad requires a tiny bit of forethought so that you can let the veggies pickle for a few hours, but it’s well worth the effort for a crowd-pleasing, tangy and bright salad that complements any other BBQ dishes. #meandthemoose #pastasalad #pastarecipes #summerbbq #pickles #pickledveggies

The recipe I’ve developed here is best when left overnight, but the veggies can be eaten after about 3 hours and definitely taste pickled. Leaving them overnight helps the garlic to mellow, which can be considered a kindness to your guests, no? But also feel free to omit the garlic if you must.

And while I haven’t included anything but the pasta, dressing, and veggies in this recipe, you can customize this dish in whatever way suits your family. I make this for the three of us with mozzarella balls or feta. I’ve also thought about searing some salmon and flaking it in there or just opening a can of tuna and dumping that in. Also, the pickled veggies remind me of gardiniera, so I’m sure a salami or other Italian cured meat would be amazing in there. Experiment! Go crazy!

This pasta salad requires a tiny bit of forethought so that you can let the veggies pickle for a few hours, but it’s well worth the effort for a crowd-pleasing, tangy and bright salad that complements any other BBQ dishes. #meandthemoose #pastasalad…

This pasta salad requires a tiny bit of forethought so that you can let the veggies pickle for a few hours, but it’s well worth the effort for a crowd-pleasing, tangy and bright salad that complements any other BBQ dishes. #meandthemoose #pastasalad #pastarecipes #summerbbq #pickles #pickledveggies

A couple of notes:

  • I’ve made this salad by putting all of the veggies into one jar and I’ve made them by separating the different veggies into their own jars. If you do the veggies separately, you might need to increase the amount of pickling liquid. Just double or triple the amount of vinegar, sugar, and salt that you mix together and spread it among the different containers.

  • I opted for scallions because, though I LOVE a pickled red onion, they turn the pickling liquid (and everything else that’s being soaked) a bit pink.

  • I also used fresh corn because it’s in season and is so sweet and perfect right off of the cob that I can’t imagine not using it. But I’m sure frozen would do the trick too.

  • I give a range of oil and a range of pasta to use here. Some fancier pasta comes in smaller amounts (12-14 oz is a popular weight), but you can definitely use a whole pound of that’s the amount you have. Obviously, the more pasta you use, the less prominent the veggies will be and the more sauce you’ll need and vice versa.

  • I’ve also made this with chickpea pasta and, dare I say it, I might PREFER the bean pasta to regular white pasta. Shocking, I know.

This pasta salad requires a tiny bit of forethought so that you can let the veggies pickle for a few hours, but it’s well worth the effort for a crowd-pleasing, tangy and bright salad that complements any other BBQ dishes. #meandthemoose #pastasalad…

This pasta salad requires a tiny bit of forethought so that you can let the veggies pickle for a few hours, but it’s well worth the effort for a crowd-pleasing, tangy and bright salad that complements any other BBQ dishes. #meandthemoose #pastasalad #pastarecipes #summerbbq #pickles #pickledveggies

Pickled veggie pasta salad

Active time: About 30 minutes, mostly spent chopping and mixing
Total time: Anywhere from 3 hours to 1 week, depending on how much you let the pickles sit
Yield: About 9-10 cups of salad

¾ cup white vinegar
1½ Tbsp sugar
¾ tsp salt
3 large cloves garlic, peeled and smashed
½ large bunch scallions (about 4-5 large), trimmed and roughly chopped
1 pint cherry tomatoes, halved  
½ large orange bell pepper, roughly chopped
2-3 large ears corn, with kernels removed (or about 1½-2 cups)
12-16 oz dried pasta (depending on the ratio of vegetables to pasta that you prefer)
1/2- 3/4 cup olive oil
2 Tbsp red wine vinegar
½ tsp Dijon mustard
½ tsp kosher salt
¼ tsp fresh pepper
½ tsp dried or 1 tsp fresh oregano, well minced if using fresh
¼- ½ cup fresh basil leaves, torn

For the pickled vegetables:
In a small bowl, combine the vinegar, sugar, and salt and stir until the sugar has dissolved, about 2 minutes. (You won’t hear any more crunching on the bottom of the container.)

In a large container or several smaller containers with a tight fitting lid (see note above about the amount of pickling liquid if making the pickles in separate jars), add the smashed garlic, chopped scallions, and chopped vegetables. Pour in the vinegar mixture, seal the container, and shake a few times.

Place in the refrigerator and leave for 3 hours or up to 1 week.

For the salad:
Cook your pasta according to package directions in well-salted water.

While your pasta cooks, combine the oil, red wine vinegar, dijon mustard, salt, pepper, and oregano in a small container.

Once the pasta is cooked, drain it and add it to a very large bowl. Add half of the olive oil mixture and stir well.

With a large fork or slotted spoon, remove the vegetables from the pickling liquid, transferring as little of the brine as possible (though don’t go crazy). Set aside the garlic cloves and mince the pickled cloves. Add everything to the pasta and stir well.

Add more of the olive oil mixture to taste until you feel that the pasta salad is wet enough.

Mix in and top with the torn basil before serving.

Roasted strawberry and rhubarb butter

Roughly chop some fruit and toss it in the oven for a spring-y fruit butter that’s naturally sweet, SUPER EASY, and extremely versatile. #meandthemoose #strawberryrhubarb #fruit #fruitbutter #naturallysweet #jam

Roughly chop some fruit and toss it in the oven for a spring-y fruit butter that’s naturally sweet, SUPER EASY, and extremely versatile. #meandthemoose #strawberryrhubarb #fruit #fruitbutter #naturallysweet #jam

Rhubarb season is here! Turn this tart veg into a thick, spreadable butter to use all day, every day.

Take me to the recipe!

Roughly chop some fruit and toss it in the oven for a spring-y fruit butter that’s naturally sweet, SUPER EASY, and extremely versatile. #meandthemoose #strawberryrhubarb #fruit #fruitbutter #naturallysweet #jam

Roughly chop some fruit and toss it in the oven for a spring-y fruit butter that’s naturally sweet, SUPER EASY, and extremely versatile. #meandthemoose #strawberryrhubarb #fruit #fruitbutter #naturallysweet #jam

Roughly chop some fruit and toss it in the oven for a spring-y fruit butter that’s naturally sweet, SUPER EASY, and extremely versatile. #meandthemoose #strawberryrhubarb #fruit #fruitbutter #naturallysweet #jam

Roughly chop some fruit and toss it in the oven for a spring-y fruit butter that’s naturally sweet, SUPER EASY, and extremely versatile. #meandthemoose #strawberryrhubarb #fruit #fruitbutter #naturallysweet #jam

If you’ve searched Instagram recently, it’ll come as no surprise that rhubarb is a very photogenic vegetable. The variations in color lend themselves to ombre-ing and chevron-ing to your heart’s content. But today, we’re keeping it simple by doing neither of those things.

Instead, we’re turning strawberries (fresh or frozen!) and those giant rhubarb stalks you find in the grocery store (or your garden if you’re lucky enough to grow your own) into a butter akin to apple or pumpkin. Because why should fall fruits and vegetables have all the fun?

In early spring, I use frozen berries because it annoys me that strawberry and rhubarb are a perfect combination, but their growing seasons only overlap for a hot minute here in New England. Buuuuut, I found some giant, organic BBs in the grocery store recently, so I went for it with the fresh berries a little earlier this year.

Roughly chop some fruit and toss it in the oven for a spring-y fruit butter that’s naturally sweet, SUPER EASY, and extremely versatile. #meandthemoose #strawberryrhubarb #fruit #fruitbutter #naturallysweet #jam

Roughly chop some fruit and toss it in the oven for a spring-y fruit butter that’s naturally sweet, SUPER EASY, and extremely versatile. #meandthemoose #strawberryrhubarb #fruit #fruitbutter #naturallysweet #jam

A couple of notes:

  • Let the berries and rhubarb cook until the juices start to get a little syrupy. You can test this by sticking a spoon into the hot liquid (DON’T USE YOUR FINGER!!!). If the strawberry juice coats the back of the spoon and doesn’t drip off entirely, you’re about done. Make sure that your berries don’t burn because they can taste bitter.

  • This is a TART butter because, well, rhubarb is tart and that’s the beauty of it. If you like things a little sweeter, you can add a bit of sugar or use more berries than rhubarb. OR, you can combine the tart butter with sweeter things like cakes, cookies, sweetened yogurt, and whipped cream.

Roughly chop some fruit and toss it in the oven for a spring-y fruit butter that’s naturally sweet, SUPER EASY, and extremely versatile. #meandthemoose #strawberryrhubarb #fruit #fruitbutter #naturallysweet #jam

Roughly chop some fruit and toss it in the oven for a spring-y fruit butter that’s naturally sweet, SUPER EASY, and extremely versatile. #meandthemoose #strawberryrhubarb #fruit #fruitbutter #naturallysweet #jam

Roughly chop some fruit and toss it in the oven for a spring-y fruit butter that’s naturally sweet, SUPER EASY, and extremely versatile. #meandthemoose #strawberryrhubarb #fruit #fruitbutter #naturallysweet #jam

Roughly chop some fruit and toss it in the oven for a spring-y fruit butter that’s naturally sweet, SUPER EASY, and extremely versatile. #meandthemoose #strawberryrhubarb #fruit #fruitbutter #naturallysweet #jam

Roasted strawberry rhubarb butter

time: About 1 hour, 45 minutes, about 5 minutes active time
Yield: 12 oz (1½-2 cups)

4 heaping cups strawberries (fresh or frozen)
2 heaping cups chopped fresh rhubarb (about 3 extra extra-large stalks or 6-8 smaller stalks, chopped into 1-inch chunks)

Preheat the oven to 350.

Wash and chop the rhubarb. Combine with the frozen strawberries on a parchment-lined, rimmed baking tray.

Cook for 25-30 minutes, until the fruit is soft, the strawberries have released their juices, and the juice has started to become syrupy (see note above). Watch the berries closely after about 20 minutes to ensure that they don’t burn.

Let the fruit cool completely, about 15 minutes.

Scoop the fruit into your blender. Whatever juice gets onto the spoon is fine, but don’t add any remaining syrup.

Blend until smooth.

Store in the fridge for up to 7 days.

Sunflower seed butter with flax and chia

Sunflower seed butter | Me & The Moose. This homemade sunflower seed butter tastes so much better than store-bought and is fortified with flax and chia seeds. #meandthemoose #sunflowerseedbutter #lunchboxideas #lunch #lunchbox #sunflowerseedreci…

Once again, I’m copying Trader Joe’s. They have a peanut butter with flax and chia and it’s a fantastic way to get some extra nutrition into a picky eater. Here’s my school-safe version!

Jump to the recipe!

I have a confession to make: I go back and forth between caring A WHOLE LOT about M’s nutrition and then feeling like there are a million little struggles every day and I don’t want to add food to that list.

And he’s always been a contrarian with FOMO, which means he doesn’t love limits. The “perfect parent” voice in my head constantly beats me up about not being stricter. Don’t get me wrong, I say “no” to things 100 times a day and we obviously set lots of boundaries. But we’ve figured out that M does better when he has choice within those limits and that we have to say “yes” to some things or there will be a meltdown.

Anyway, part of M’s way of gaining control these days is that he has VERY strong opinions about food. What he loves one day, he hates the next. Peanut butter mixed into applesauce has been a constant and lately he’s been really into PB&J’s after watching this silly video.

BUT we can’t send any nuts to school, so sunflower seed butter it is. Unfortunately, a lot of the store-bought ones don’t taste great. I’ve made my own sunflower seed butter before and I do love this recipe. But if M’s eating this for at least one meal per day, I wanted to beef up the nutrition. And it tastes so good, he doesn’t complain!

Sunflower seed butter | Me & The Moose. This homemade sunflower seed butter tastes so much better than store-bought and is fortified with flax and chia seeds. #meandthemoose #sunflowerseedbutter #lunchboxideas #lunch #lunchbox #sunflowerseedreci…

A couple of notes about this nut butter:

  • When roasting the nuts, you want them to be mostly brown and golden rather than gray. But watch to make sure that they don’t burn! (See the photos above for a before and after.) Well-roasted seeds are much easier to process than ones that are still partly raw.

  • The grinding process takes a bit of patience. If you let the machine run, the seeds will come together into a paste. There are more detailed instructions for the individual grinding steps in the recipe below. Be sure to read the recipe before starting this butter.

  • Storage: I store this seed butter in the fridge because I’ve read that flax and chia (and seeds in general) tend to get rancid quickly when left vulnerable to moisture and heat in the cabinet). The cold tightens the butter considerably, but 20 seconds in the microwave makes the butter easily spreadable again.

Sunflower seed butter | Me & The Moose. This homemade sunflower seed butter tastes so much better than store-bought and is fortified with flax and chia seeds. #meandthemoose #sunflowerseedbutter #lunchboxideas #lunch #lunchbox #sunflowerseedreci…

Sunflower seed butter with flax and chia

Yield: 2-2¼ cups 
Time: 30-35 minutes

3 cups raw sunflower seeds
4-6 Tbsp coconut oil, melted
2 Tbsp maple syrup
2 tsp vanilla extract
1 tsp cinnamon
1 tsp flaky sea salt
3 Tbsp each chia seeds
3 Tbsp whole flax seeds

  1. Preheat the oven to 350. Spread the raw sunflower seeds out on a large sheet pan. Roast for 5 minutes and shake the tray. Roast for 2-3 minutes more, checking to make sure that the seeds don’t burn. When the seeds are uniformly more golden brown than gray, they’re ready for processing.

  2. Add the roasted seeds to a large food processor and grind for 2 minutes. The seeds will break up and look very dry and like breadcrumbs.

  3. Add 2 Tbsp of coconut oil and the maple syrup and process for 2 more minutes. At this stage, the seeds start coming together in a large slow-moving glacier of seed butter. Scrape down the sides and break up the glacier as necessary. It will still feel dry and crumbly when you break up the glacier.

  4. Add the vanilla and cinnamon and process again, this time letting the machine run. Let it go for at least 3-4 minutes before adding more coconut oil as the heat of the processor and the continued grinding will start to make the butter smoother and wetter. The glacier of seed butter will still be forming, but will be spinning around the food processor much faster.

  5. After that 3-4 minutes, and while the food processor is running, add the other 2-4 Tbsp of coconut oil to achieve a silky consistency. Don’t add more maple syrup or water because it will make the seed butter stick together and clump more instead of smoothing it out.

  6. The whole process of grinding the seeds into a smooth butter usually takes between 15 and 20 minutes (including stopping add ingredients), so patience is key.

  7. Transfer to a large bowl and stir in the sea salt, chia seeds and flax seeds and stir well.

Sunflower seed butter | Me & The Moose. This homemade sunflower seed butter tastes so much better than store-bought and is fortified with flax and chia seeds. #meandthemoose #sunflowerseedbutter #lunchboxideas #lunch #lunchbox #sunflowerseedreci…