Chicken and apple breakfast sausages

Chicken and apple breakfast sausages | Me & The Moose. These easy chicken and apple sausage patties are an easy batch bake that can deliciously simplify your mornings. #meandthemoose #breakfast #sausages #chickensausage #sage #healthybreakfastre…

These chicken and apple breakfast sausage patties are super quick, packed with flavor, and a great way to add some lean protein to your breakfasts.

Take me to the recipe!

Chicken and apple breakfast sausages | Me & The Moose. These easy chicken and apple sausage patties are an easy batch bake that can deliciously simplify your mornings. #meandthemoose #breakfast #sausages #chickensausage #sage #healthybreakfastre…

So! It’s been forever since I last posted because, like half of the food bloggers I follow, I’ve been busy cooking something else: A BABY. Normally I have a strong sense of smell, but pregnancy turns me into a bloodhound. Combine that with constant nausea, and you can imagine how I’ve felt about cooking or looking at food photos or being in the kitchen or even opening the refrigerator door.

Luckily, I started working on a homemade version of chicken and apple sausages (a family favorite) WAY before they started making me nauseous, so I know they’re good. Plus, they’re easy to whip up over the weekend and then store or freeze for future breakfasts. OR, if you’re feeling ambitious, you can even make them on a weekday morning if you’re one of those people with your shit together on school days.

I fiddled around a lot with the spice mix so that it would be strong enough to compensate for how little fat is in the recipe. I use a combination of fresh and dried sage but you could certainly opt for a single type. If you like less garlic or just milder flavors generally, cut back on the garlic powder and the patties will still taste great.

A note about the fat we add: It’s only a Tbsp, which may feel like too little or too much depending on where you stand and you may be tempted to add more or leave it out. But I’ve found that 1 Tbsp is enough to keep the meat from drying out without making it taste oily or making the texture crumbly.

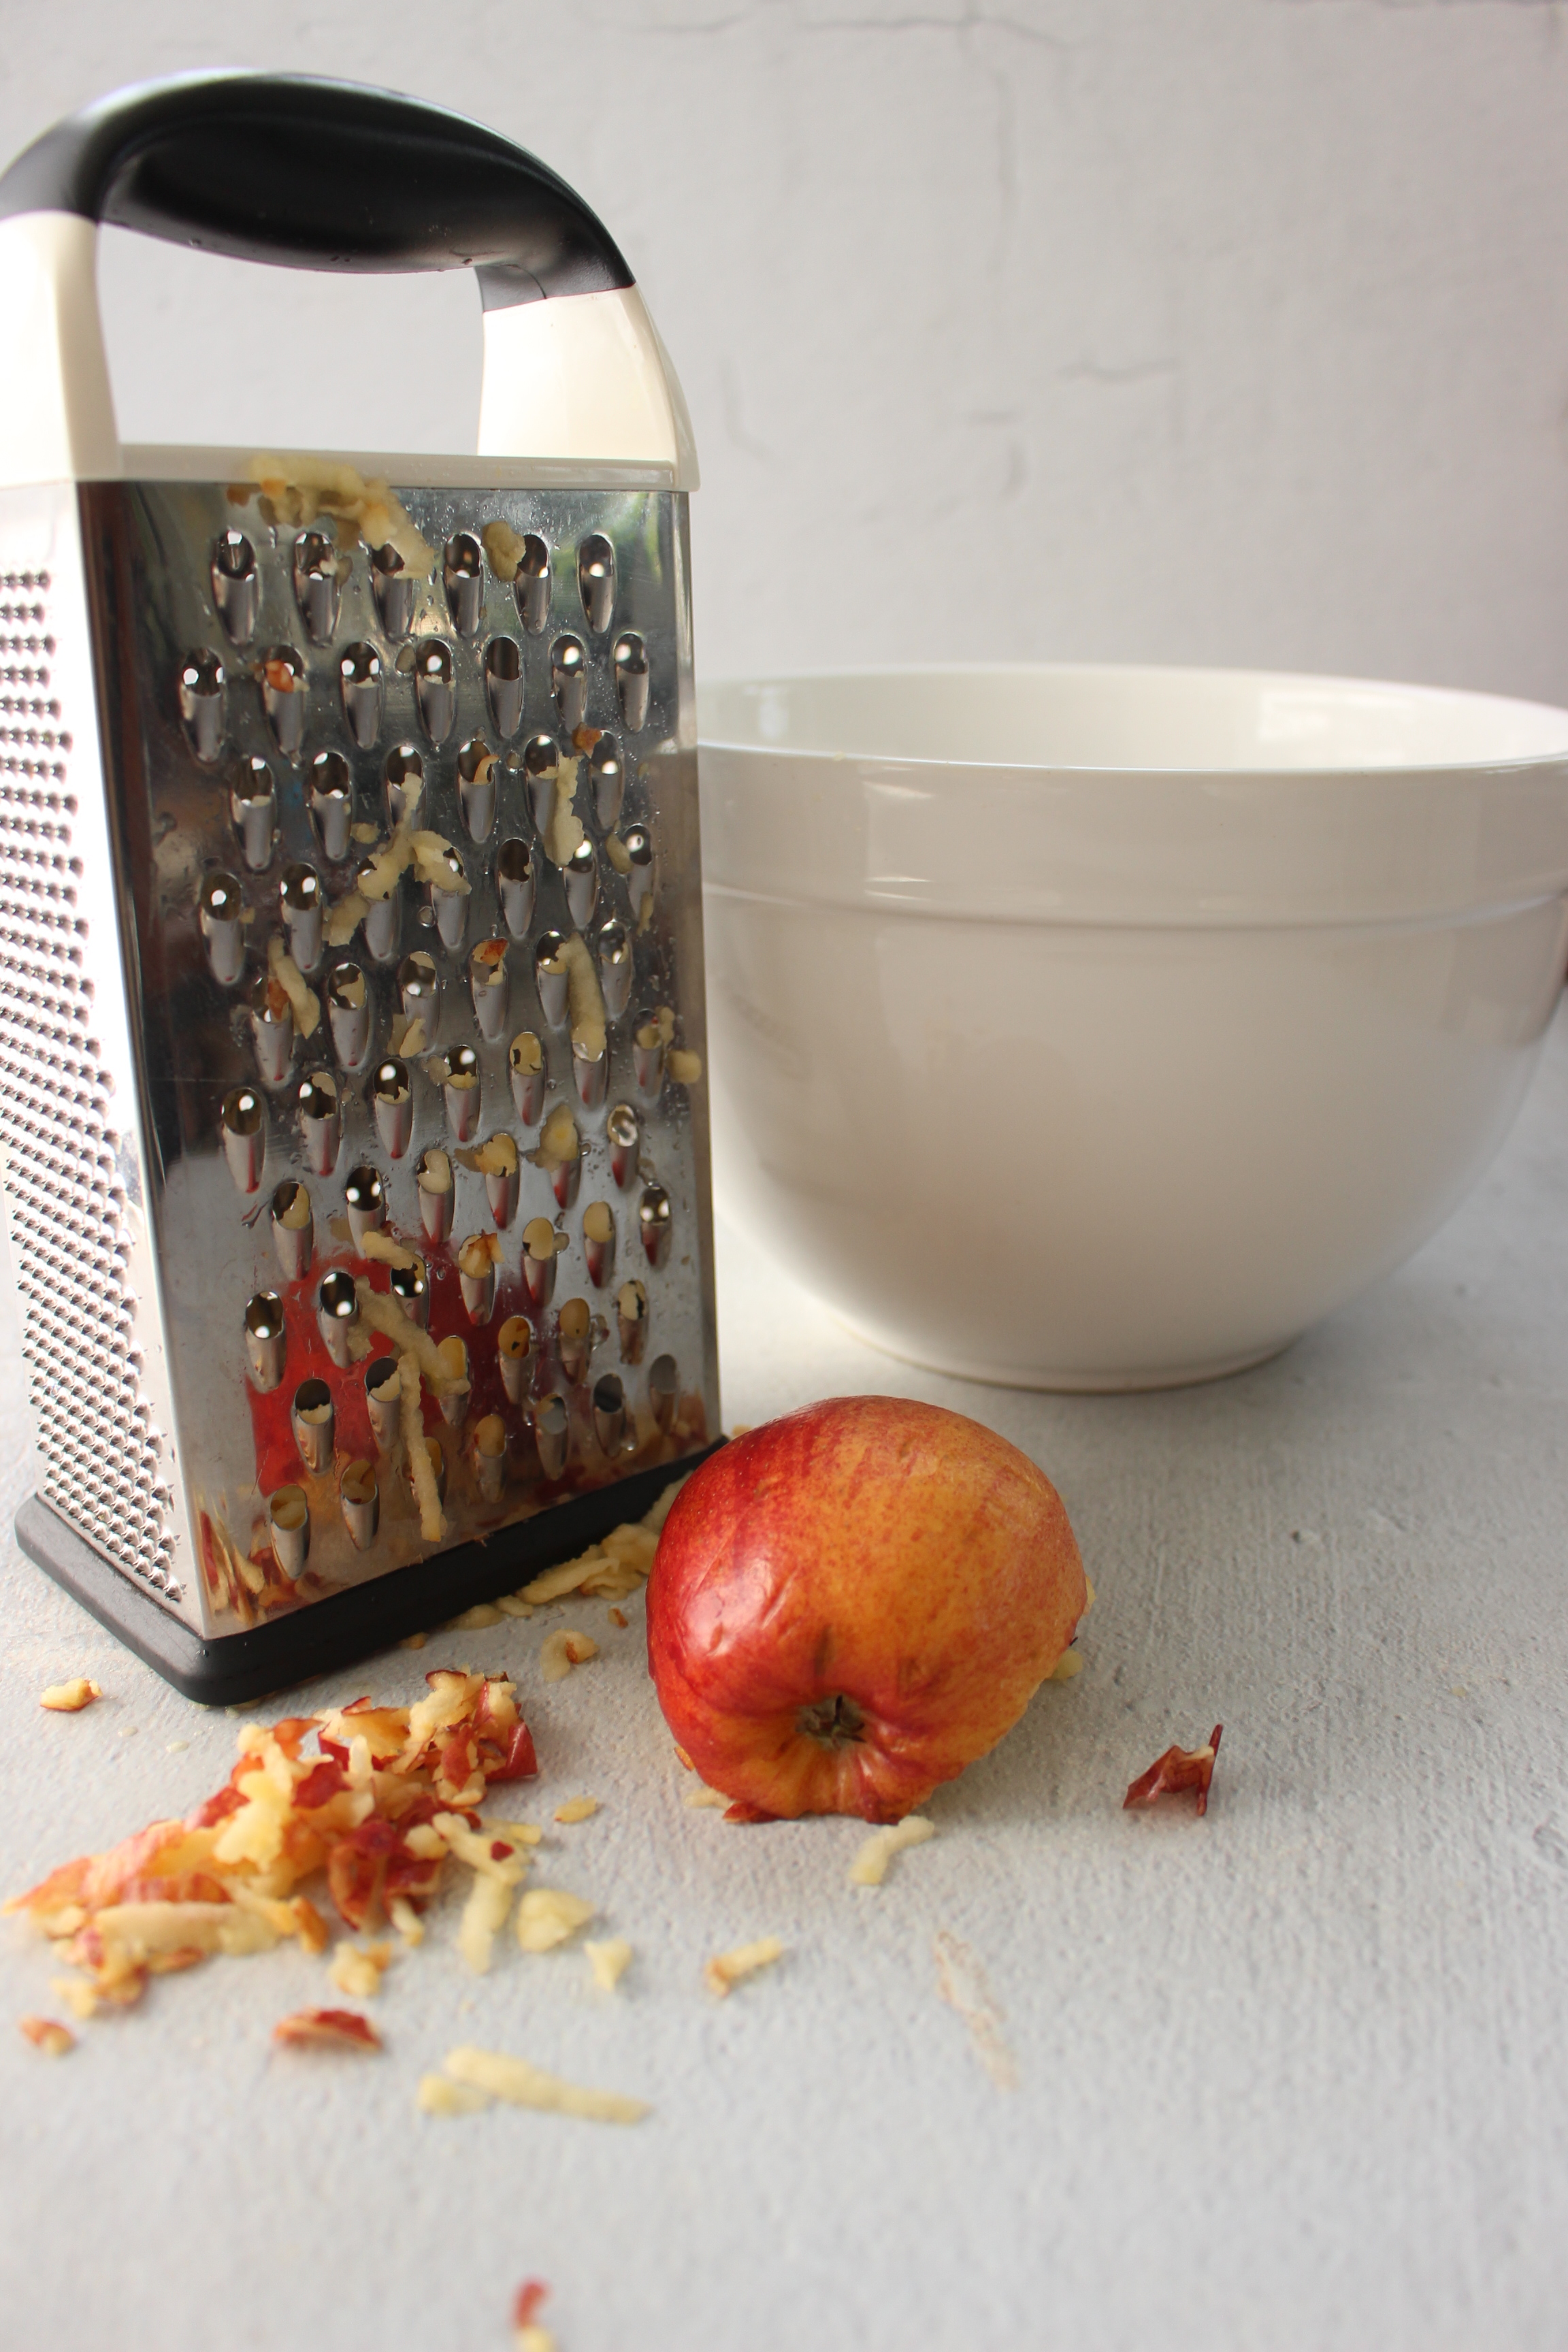
And the apple adds a little sweetness and a little moisture.

Chicken and apple breakfast sausages | Me & The Moose. These easy chicken and apple sausage patties are an easy batch bake that can deliciously simplify your mornings. #meandthemoose #breakfast #sausages #chickensausage #sage #healthybreakfastre…

Chicken and apple breakfast sausages

Time: 15 total (5 prep, 10 cooking)
Yield: 16 patties

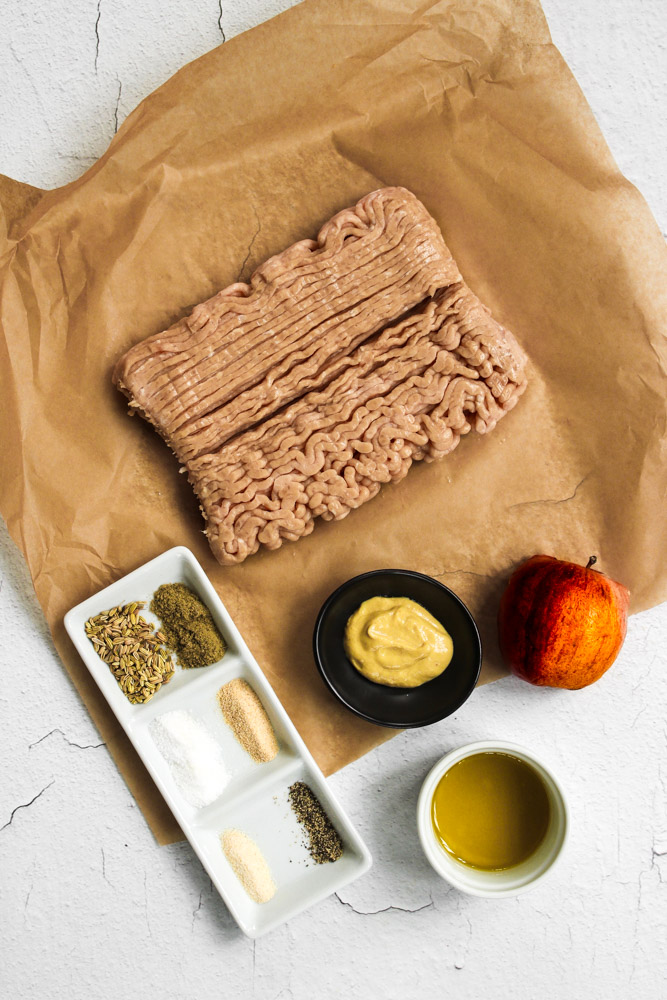
1 lb ground chicken, (7-8% fat)  
1 small apple, shredded (about ½ cup of apple)
2 Tbsp olive oil, divided
1 Tbsp Dijon mustard
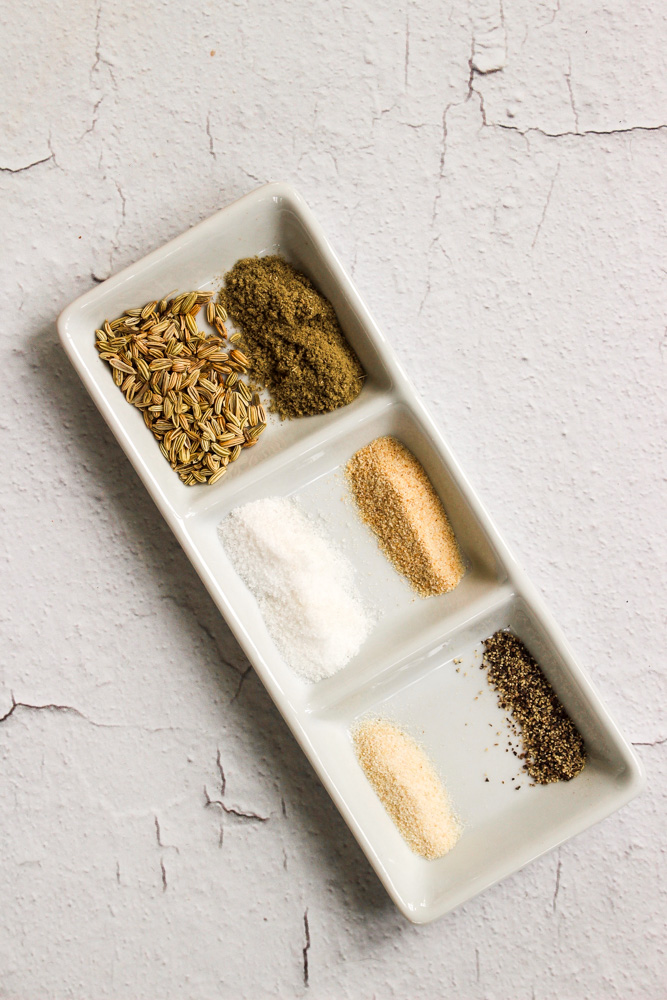
1 tsp dried sage
1 tsp fennel seeds
½ tsp garlic powder
¼ tsp onion powder
1 tsp kosher salt
¼ tsp pepper

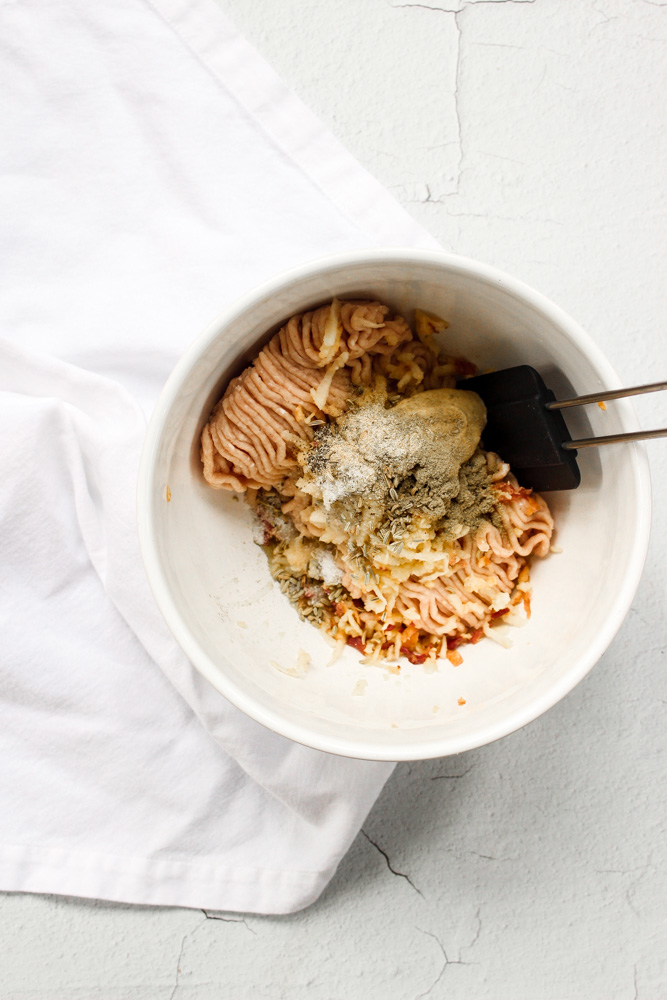
Combine the chicken, shredded apple, 1 Tbsp olive oil, and the rest of the ingredients in a large bowl. Mix just until all of the ingredients are combined.

In a large skillet, heat ½-1 Tbsp of oil over a medium flame until hot. (If you’re cooking the sausages in batches, use half of the oil; otherwise, use it all.)

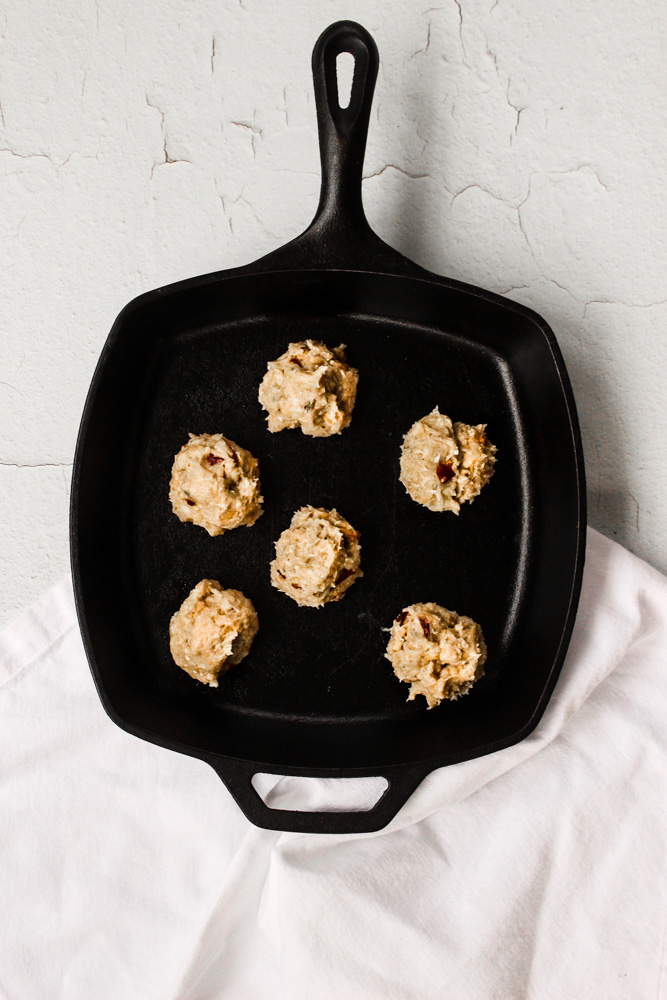
Scoop 2 Tbsp of chicken mixture into balls and place in the hot skillet. Push them down slightly to form round patties. Reduce the flame to medium low and cook until well browned on the bottoms, about 5 minutes.

Flip the patties and cook on the other side until the meat is cooked through, the patties feel firm to the touch, and/or the patties reach 165 on a meat thermometer, about 4 more minutes.

Cherry rye muffins

Cherry rye muffins | Me & The Moose. These muffins are just healthy enough without sacrificing flavor or texture and really highlight seasonal produce. #meandthemoose #cherryryemuffins #summerbaking #muffins #cherries #breakfast #healthymuffins

Cherry rye muffins are just healthy enough to feel virtuous without sacrificing flavor or texture. I promise these are worth heating up your kitchen for!

Take me to the muffins, please!

Cherry rye muffins | Me & The Moose. These muffins are just healthy enough without sacrificing flavor or texture and really highlight seasonal produce. #meandthemoose #cherryryemuffins #summerbaking #muffins #cherries #breakfast #healthymuffins

It’s been a minute since I posted something to the blog here and I have no excuse except that… I hate July. Don’t get me wrong, there is A LOT to love about summer. Produce, herbs, ice cream, pick-your-own blueberries, swimming, beach days, later nights, more sunlight, BBQs, a slower pace, vacations, etc. But the bugs and sweat and general malaise that overtakes me when that weighted blanket of humidity settles over the northeast, make it nearly impossible for me to stay productive.

However! I’ve soldiered on behind the scenes and heated my kitchen countless times to get these muffins exactly right.

The rye flour, to me, is just enough to taste the nutty flavor without changing the texture or inhibiting the rise on these muffins.

I also added just enough baking powder and soda to get a good amount of leavening without leaving a weird bitter aftertaste from too much rising agent. A note about rising agents: I’ve been adding the rising agent at the end and letting the batter bubble slightly after learning this technique from the America’s Test Kitchen Cookbook. Does it make a huge difference in these muffins? I’m not sure. But it certainly doesn’t hurt.

Cherry rye muffins | Me & The Moose. These muffins are just healthy enough without sacrificing flavor or texture and really highlight seasonal produce. #meandthemoose #cherryryemuffins #summerbaking #muffins #cherries #breakfast #healthymuffins

I’ve also combined fresh, sweet cherries for moisture and seasonality, but added some unsweetened and unsulfured dried cherries for a concentrated cherry flavor. I haven’t tried omitting either from the batter, but in the coming months, I’m sure frozen cherries could be subbed for the fresh.

How to check fruit desserts for doneness: This can be tricky! When there’s a lot of fruit in a batter, checking with a toothpick or cake tester can be misleading because if you stick it into a piece of fruit, the tester may come out looking wet. Instead, I like to push on the tops of the muffins a bit and feel how firm they are. If the top springs back and maintains its shape after gently squished and the body of the muffin feels lightly firm (like a medium rare steak; you don’t want a hocky puck with no give, but you also don’t want to feel at risk of sticking your finger through the muffin), they’re done.

Also, let the muffins cool completely. Like, really let them cool. I’m the queen of eating muffins too soon and I end up losing half of the crust when it sticks to the baking paper and the muffin can be crumbly when still warm. But if you must, don’t say I didn’t warn you.

Cherry rye muffins | Me & The Moose. These muffins are just healthy enough without sacrificing flavor or texture and really highlight seasonal produce. #meandthemoose #cherryryemuffins #summerbaking #muffins #cherries #breakfast #healthymuffins

Cherry rye muffins

Active time: 20-25 minutes
Total time: 1 hour, 40-45 minutes
Yield: 12 muffins


3 Tbsp butter, softened to room temperature for about 1 hour
¾ cup coconut sugar 
2 eggs
¾ cup full fat plain yogurt
1 tsp vanilla extract
1½ cups AP flour
½ cup rye flour
2 Tbsp flax seed meal
¼ tsp salt
1 cup whole cherries, roughly chopped
¼ cup dried, unsweetened cherries, minced
1½ tsp baking powder
½ tsp baking soda

Streusel topping
2 Tbsp butter, softened to room temperature for about hour
½ cup oats
1/8 tsp salt
¼ cup packed brown sugar

Preheat the oven to 400.

In a large bowl, mix together the softened butter (no need to use a hand mixer, just elbow grease and a wooden or silicone spatula) and the coconut sugar.

Add the eggs and mix until fully combined.

Add the yogurt and vanilla extract and mix again until fully combined.

Add the flours, flax seeds, and salt to the wet mixture and mix until no streaks of flour remain.

Add the fresh and dried cherries and mix in 10 times.

Finally, add the baking powder and baking soda and mix just until combined. Let sit while you make the streusel topping.

In a small bowl, mix together the butter, oats, salt, and brown sugar until well combined. I like to use my hands for this.

In a greased or baking cup-lined muffin tin, fill each opening to the top with batter. Top with about 1 heaping tsp of the streusel mixture (I usually eyeball this bit and try my best to make the topping equal).

Bake at 400 for 16-20 minutes or until the muffins are lightly firm to the touch and golden brown on top.

Baked gigante beans with feta and tomatoes

Baked gigante beans with feta and tomatoes | Me & The Moose. This vegetarian dinner, lunch, appetizer, or side is full of fiber, protein, good fats, and sweet syrupy roasted tomatoes. #meandthemoose #dinner #meatlessmonday #vegetarian #bakedfeta…

Anyone out there who might think that a “meatless” meal wouldn’t satisfy them, hasn’t had giant white beans for dinner. This meal is full of fiber, protein, and delicious sweetness from the roasted tomatoes.

Straight to the recipe, please!

Baked gigante beans with feta and tomatoes | Me & The Moose. This vegetarian dinner, lunch, appetizer, or side is full of fiber, protein, good fats, and sweet syrupy roasted tomatoes. #meandthemoose #dinner #meatlessmonday #vegetarian #bakedfeta…

Gigante beans, lima beans, large white beans, whatever you want to call them, these beans make a meal in a way that other legumes don’t always cut it for me.

I’ve only ever seen these beans in dry form, so while I’m averse to most extra work in the kitchen, I don’t see a way around cooking them yourself if you want to use these big guys.

Which leads us to the age old question: Do you really need to soak dried beans? Some will insist that you do. I say, LAZY COOKS UNITE! I have a preschooler and don’t always have that much foresight.

But here’s one caveat: Sans soaking, the simmering times vary WILDLY for these beans. One batch I made from Brand A were ready after about 90 minutes.. Brand B took almost twice as long. And while everyone advises “look for fresh beans,” if you could seriously show me a bag of beans with an expiration date on it, I would give you a million dollars.

Baked gigante beans with feta and tomatoes | Me & The Moose. This vegetarian dinner, lunch, appetizer, or side is full of fiber, protein, good fats, and sweet syrupy roasted tomatoes. #meandthemoose #dinner #meatlessmonday #vegetarian #bakedfeta…

So, here are some handy tutorials that you can peruse and decide if you’re team soak or team no soak:

If I was the meal prepping type I’d suggest making a whole bag of these beans one weekend and freezing them for easy weeknight meals. Because once you cook the beans, this meal could not be easier or faster.

Roasting makes the tomatoes syrupy sweet, the cheese just a little soft and gooey, and the bean skins crispy in a way that is completely satisfying.

Baked gigante beans with feta and tomatoes | Me & The Moose. This vegetarian dinner, lunch, appetizer, or side is full of fiber, protein, good fats, and sweet syrupy roasted tomatoes. #meandthemoose #dinner #meatlessmonday #vegetarian #bakedfeta…

A few notes:

  • I salt the bean cooking water and then don’t add any more salt until serving the beans. They soak up the sodium during cooking, so it’s very easy to over salt this dish. Also, feta is a salt bomb, so we’ve found that the end product needs no extra seasoning.

  • I’ve billed this as a meatless meal, but it could also serve as a side or appetizer just as easily.

  • Do NOT skip the lemon zest in the end. The citrus brightens up the beans and adds a layer of flavor without which, the beans could taste a bit flat.

  • I prefer to use a combo of both dried and fresh oregano, but use what you have on hand.

Baked gigante beans with feta and tomatoes | Me & The Moose. This vegetarian dinner, lunch, appetizer, or side is full of fiber, protein, good fats, and sweet syrupy roasted tomatoes. #meandthemoose #dinner #meatlessmonday #vegetarian #bakedfeta…

Baked feta with gigante beans and tomatoes


Active time: about 20 minutes, on and off
Total time: 90-150 for the beans, 25-30 for the main dish
Yield: 4 dinner servings,

For the beans:
1½ cups dried giant white beans, rinsed
4 cups vegetable stock
1-2 cups water (as needed)
½ tsp sea salt
1-2 bay leaves
4 medium cloves garlic, peeled, but left whole

Yield: 3 heaping cups of cooked beans

Combine the beans, stock, salt, bay leaf, and garlic cloves in a large pot. Bring to a boil over high heat. Reduce flame to low and simmer, covered, for anywhere from 1 1/2 hours to 2 1/2 hours (90-150 minutes), stirring occasionally, until the beans are creamy and soft, but not falling apart and most of the liquid has been absorbed.

Check the beans after 60 minutes and then every 15-30 minutes after that (depending on how your beans are progressing) until the beans are tender throughout. Add more liquid if the water boils off before the beans are fully cooked.

 Drain any remaining liquid from the beans and remove the bay leaves.

For the main dish:
1/2 cup olive oil, divided  
½ tsp Aleppo pepper (optional)
1 tsp dried oregano or 1 Tbsp fresh oregano (or a combination of both dried for cooking and fresh for topping)
½ tsp smoked paprika
2-3 cups cherry tomatoes, whole (about 8-12 oz)
Small block Feta cheese (8 oz)
½ tsp lemon zest (zest of one small lemon)

Preheat oven to 400.

In a bowl or the pot you used to simmer the beans, add 1/4 cup of olive oil, Aleppo pepper, oregano, paprika, and tomatoes to the beans and mix well.

In a 9x13 baking pan (or whatever size you have), spread out the bean and tomato mixture. Clear a hole in the middle and add the feta.

Cook for 20-23 minutes, until the feta is soft and the tomatoes have released their juices AND those juices have become a little syrupy.  

Remove from the heat and top with the remaining 1/4 cup of olive oil, lemon zest, fresh oregano (if using), and sprinkling of flaky sea salt (if needed).

Roasted strawberry and rhubarb butter

Roughly chop some fruit and toss it in the oven for a spring-y fruit butter that’s naturally sweet, SUPER EASY, and extremely versatile. #meandthemoose #strawberryrhubarb #fruit #fruitbutter #naturallysweet #jam

Roughly chop some fruit and toss it in the oven for a spring-y fruit butter that’s naturally sweet, SUPER EASY, and extremely versatile. #meandthemoose #strawberryrhubarb #fruit #fruitbutter #naturallysweet #jam

Rhubarb season is here! Turn this tart veg into a thick, spreadable butter to use all day, every day.

Take me to the recipe!

Roughly chop some fruit and toss it in the oven for a spring-y fruit butter that’s naturally sweet, SUPER EASY, and extremely versatile. #meandthemoose #strawberryrhubarb #fruit #fruitbutter #naturallysweet #jam

Roughly chop some fruit and toss it in the oven for a spring-y fruit butter that’s naturally sweet, SUPER EASY, and extremely versatile. #meandthemoose #strawberryrhubarb #fruit #fruitbutter #naturallysweet #jam

Roughly chop some fruit and toss it in the oven for a spring-y fruit butter that’s naturally sweet, SUPER EASY, and extremely versatile. #meandthemoose #strawberryrhubarb #fruit #fruitbutter #naturallysweet #jam

Roughly chop some fruit and toss it in the oven for a spring-y fruit butter that’s naturally sweet, SUPER EASY, and extremely versatile. #meandthemoose #strawberryrhubarb #fruit #fruitbutter #naturallysweet #jam

If you’ve searched Instagram recently, it’ll come as no surprise that rhubarb is a very photogenic vegetable. The variations in color lend themselves to ombre-ing and chevron-ing to your heart’s content. But today, we’re keeping it simple by doing neither of those things.

Instead, we’re turning strawberries (fresh or frozen!) and those giant rhubarb stalks you find in the grocery store (or your garden if you’re lucky enough to grow your own) into a butter akin to apple or pumpkin. Because why should fall fruits and vegetables have all the fun?

In early spring, I use frozen berries because it annoys me that strawberry and rhubarb are a perfect combination, but their growing seasons only overlap for a hot minute here in New England. Buuuuut, I found some giant, organic BBs in the grocery store recently, so I went for it with the fresh berries a little earlier this year.

Roughly chop some fruit and toss it in the oven for a spring-y fruit butter that’s naturally sweet, SUPER EASY, and extremely versatile. #meandthemoose #strawberryrhubarb #fruit #fruitbutter #naturallysweet #jam

Roughly chop some fruit and toss it in the oven for a spring-y fruit butter that’s naturally sweet, SUPER EASY, and extremely versatile. #meandthemoose #strawberryrhubarb #fruit #fruitbutter #naturallysweet #jam

A couple of notes:

  • Let the berries and rhubarb cook until the juices start to get a little syrupy. You can test this by sticking a spoon into the hot liquid (DON’T USE YOUR FINGER!!!). If the strawberry juice coats the back of the spoon and doesn’t drip off entirely, you’re about done. Make sure that your berries don’t burn because they can taste bitter.

  • This is a TART butter because, well, rhubarb is tart and that’s the beauty of it. If you like things a little sweeter, you can add a bit of sugar or use more berries than rhubarb. OR, you can combine the tart butter with sweeter things like cakes, cookies, sweetened yogurt, and whipped cream.

Roughly chop some fruit and toss it in the oven for a spring-y fruit butter that’s naturally sweet, SUPER EASY, and extremely versatile. #meandthemoose #strawberryrhubarb #fruit #fruitbutter #naturallysweet #jam

Roughly chop some fruit and toss it in the oven for a spring-y fruit butter that’s naturally sweet, SUPER EASY, and extremely versatile. #meandthemoose #strawberryrhubarb #fruit #fruitbutter #naturallysweet #jam

Roughly chop some fruit and toss it in the oven for a spring-y fruit butter that’s naturally sweet, SUPER EASY, and extremely versatile. #meandthemoose #strawberryrhubarb #fruit #fruitbutter #naturallysweet #jam

Roughly chop some fruit and toss it in the oven for a spring-y fruit butter that’s naturally sweet, SUPER EASY, and extremely versatile. #meandthemoose #strawberryrhubarb #fruit #fruitbutter #naturallysweet #jam

Roasted strawberry rhubarb butter

time: About 1 hour, 45 minutes, about 5 minutes active time
Yield: 12 oz (1½-2 cups)

4 heaping cups strawberries (fresh or frozen)
2 heaping cups chopped fresh rhubarb (about 3 extra extra-large stalks or 6-8 smaller stalks, chopped into 1-inch chunks)

Preheat the oven to 350.

Wash and chop the rhubarb. Combine with the frozen strawberries on a parchment-lined, rimmed baking tray.

Cook for 25-30 minutes, until the fruit is soft, the strawberries have released their juices, and the juice has started to become syrupy (see note above). Watch the berries closely after about 20 minutes to ensure that they don’t burn.

Let the fruit cool completely, about 15 minutes.

Scoop the fruit into your blender. Whatever juice gets onto the spoon is fine, but don’t add any remaining syrup.

Blend until smooth.

Store in the fridge for up to 7 days.

Rainbow Chard Galette

Rainbow Chard Galette | Me & The Moose. This galette is a super-easy show stopper for Easter and beyond! we ate it for dinner last night and the preschooler didn’t bat an eye at the heaps of greens. #meandthemoose #rainbowchard #sidedishes #vege…

This Rainbow Chard Galette is so good (I mean, there’s cheese and puff pastry, what’s not to love) and a serious show stopper for your Easter feast (or any day, really).

Take me to the recipe!

OVENS, amiright? It recently occurred to me that the real secret to successful baking is knowing your oven well. I mean, measuring and experience and bringing things to room temperature and patience are also important, but seriously, if you know that your oven runs hot or cool or that it has uneven spots, you can really up your baking game.

As you can tell, I’m still adjusting to our oven even though we’ve lived in our current house for almost two years.

Luckily, I’ve found that store-bought puff pastry is fairly forgiving. As long as your filling isn’t too wet and the oven is at least 400 degrees, you’re pretty safe.

Which makes this easy galette a reliable option for your holiday table.

Rainbow Chard Galette | Me & The Moose. This galette is a super-easy show stopper for Easter and beyond! we ate it for dinner last night and the preschooler didn’t bat an eye at the heaps of greens. #meandthemoose #rainbowchard #sidedishes #vege…

A couple of notes:

  • I like to rip the greens off of the stems and then arrange the stems in a way that flexes my OCD muscles. HOWEVER, you can opt to chop everything together to save time and that’s perfectly acceptable.

  • Roasting garlic makes the flavor mellow and mild, which I like here because it lets the chard sing. But if you like a stronger garlic flavor, chop the cloves and saute them with the spring onions and greens instead of roasting. Or you can do half and half.

  • This galette really needs salt. I salt at the beginning and end of wilting the greens and then finish with some more salt. I like salt. If you don’t, I urge you to salt at the beginning and end of wilting (and taste test to make sure it’s not too much) and then skip the final salting rather than waiting to add salt at the end.

Rainbow Chard Galette | Me & The Moose. This galette is a super-easy show stopper for Easter and beyond! we ate it for dinner last night and the preschooler didn’t bat an eye at the heaps of greens. #meandthemoose #rainbowchard #sidedishes #vege…

Rainbow chard galette


Time: 50-60 minutes (about 30 minutes active time, depending on how intense you get about arranging the chard stems)
Yield: 9 medium pieces


4 large garlic cloves
2 Tbsp olive oil + more for roasting the garlic (about ½ cup)
2 large spring onions (white/purple and green parts), chopped (about 1 heaping cup) sub scallions if necessary
10 cups chard leaves, measured after chopping, lightly packed (about 2 medium bundles)
2 tsp balsamic vinegar
1/4 tsp kosher salt (a few big pinches)
A few cracks of black pepper
1 cup ricotta
3/4 cup nutty cheese like gruyere or aged Gouda, shredded
1 puff pastry sheet
1 Tbsp roasted garlic oil (from earlier roasted garlic)
1 egg, whisked

Preheat oven to 425.

Smash four garlic cloves (no need to remove the skin) and place in an oven-safe ramekin. Add enough olive oil to cover the garlic. Cook in the oven for 6-8 minutes, or until you start to smell garlic and the cloves are fork tender.

Meanwhile, heat 2 Tbsp olive oil in a very large skillet. Add the spring onions and sauté until translucent and fragrant, about 2 minutes.

Add the greens and a large pinch of salt. Cook until wilted, about 8-10 minutes.

Add the balsamic vinegar, another large pinch of salt, and a few cracks of fresh black pepper and stir a few times.

Once wilted, place the onions and greens into a large bowl. Add the cheeses and roasted garlic. Mix well.

On a floured surface, roll out the puff pastry dough to a thickness of 1/8th to 1/16th of an inch (about 1/3 bigger than original packaging). Move the dough to your sheet pan.

Spread the greens and cheese on the puff pastry, leaving a 1-inch frame. Fold the bare edges over onto the greens and cheese mixture.  

Arrange the chard stems in your desired pattern.

Brush the chard stems with 1 Tbsp roasted garlic oil.

Brush the lightly beaten egg over the visible parts of the pastry crust.

Bake for 18-20 minutes or until the bottom and the edges are golden brown.

Rainbow Chard Galette | Me & The Moose. This galette is a super-easy show stopper for Easter and beyond! we ate it for dinner last night and the preschooler didn’t bat an eye at the heaps of greens. #meandthemoose #rainbowchard #sidedishes #vege…